Wednesday, May 28, 2014

Fauve Artists in the Kindergarten

As we wind down this school year I am thinking about a bulletin board for the hallway, as our school is used for Summer School and I'd like the walkways to be inviting. A couple of weeks ago kindergarteners painted some patterned balloons (here). I decided to have them also paint some wild portraits inspired by Derain and Matisse (leading Fauvists) and put them together with the balloons.

This bulletin board shows a small sampling of the kids' work. My plan for "back-to-school" in the Fall is to fill the Auditorium boards with the rest of their Fauve artwork. That should be pretty welcoming as we start school again in August!!

For this lesson, I started by sharing some portraits by Derain and Matisse and the kids compared them to portraits done in the 1700s. Fauve means "wild beast" and that captured everyone's attention right away!!

Students drew their portrait, with me giving guidance, using Stayonal crayons, which they have used before.


Then I pretty much turned them loose with cake tempera. The only technical part of the lesson was to compare the flat brushes they were using to the watercolor brushes they used in prior weeks and talk about the brush's care.


This is definitely one of those "no-fail" experiences!!

Sunday, May 25, 2014

Happy Memorial Day!!

Today I went with a friend and my mom to view the flags on display on EVERY gravesite at the National Cemetery in Los Angeles. My mother, who served in the US Navy when she was younger (she is going on 92!!), always likes to see this display of patriotism.
Boy Scouts placed the small flags yesterday, and I was interested to read the protocol they followed, including standing after placing each flag, observing a moment of silence and saluting.

That is the Federal Building in the background overlooking the cemetery.


We visited my Grandfather's site while we were there.

This was interesting. There are several of these Medal of Honor grave sites acknowledging Medal recipients from various periods of history. This one was from the Indian War and I saw another from the Civil War. 

Sunday, May 18, 2014

Soaring Watercolor Balloons

As the school year winds down, I am already thinking about how to decorate our Auditorium bulletin boards in August, when our new year starts. What better way than with some Kindergarten art?!

First, I read the story, Emily's Balloon to get us all in the mood. Then we looked at some "balloon" images by Jeff Koons and after discussing a few paintings of patterned and colorful hot air balloons kiddos were ready to start their own balloons.

Using a Stayonal crayon they outlined their balloon, "bumping" the edges of their paper. Then they chose interesting lines (4 or 5) to draw from one side of the balloon to the other. Pressing hard with the crayon was key to getting thick, black lines -- our goal!


Last week we talked about how to use and take care of a watercolor brush, so this was a perfect opportunity to review and practice those skills. I was actually surprised that so many of the kids could tell me the important things to remember about brush care!!


 As colors accidentally ran together, we talked about "happy accidents" that can actually make watercolor paintings more interesting. Kids really got into that idea, and I heard a lot of "oohs and aahs" and "Look, I made orange!" comments as I walked around.

After cutting out the balloons I tucked them away until August when they will appear in large bunches (about 150 of them) floating on our Welcome Back bulletin boards. I'll be sure to share with you then:))


Saturday, May 10, 2014

Collaborative Shapes

Well, all right, the shapes may not have been collaborative, but putting them together was. As kindergarteners finished their contour shapes, they matched them up with their classmates' shapes on the drying racks.

Students, using my favorite Stayonal crayons, drew a small shape in the center of their board. We were using 6" X 6" squares. They measured one finger width from their first shape and drew another shaped around the first one. They continued doing this, pressing very hard with their crayon, until they got close to (but not touching) the edges of the board. They added little "roadways" at the midway point of each side running off the board. These were so we could connect the squares later.

Then it was time to add color. Students used any colors they wanted (although we had reviewed primary and secondary colors before starting) and drew a "fat line" right next to each of their crayon lines. Then they brushed clear water over their marker line and watched the color "travel" into and on the water. Some said, "It's like magic!" They learned that it was important to load the brush with water.


Part of the focus of this lesson was to provide practice tilting the marker at the right angle to get a thick, rather than thin, line of color.


Another focus was on how to use a water color brush keeping the bristles smooth, cleaning it with water and laying it on the table (or a tray) when not being used instead of leaving it sitting upright in the water container. I used my Mr. Brush chart before we started to reinforce these brush rules.

I heard a lot of conversation when 2 or even 3 colors ran together creating a new color. This was good reinforcement for last week's lesson where kids mixed primary colors to make secondaries.


Here is what a whole class collection looks like:

Thursday, May 1, 2014

Kindergarten Fireworks

With Memorial Day and then the 4th of July coming up, kindergarteners started thinking about fireworks today. The fact that it was 90+ degrees here at the beach today helped us think about summer!!

I projected images of various fireworks paintings that I found in a Google search on the Smartboard for students to compare and discuss. We particularly focused on the direction of the lines. Then, using Ellen Stoll Walsh's Mouse Paint, we reviewed what colors can be mixed using primary colors. And then the fun began:

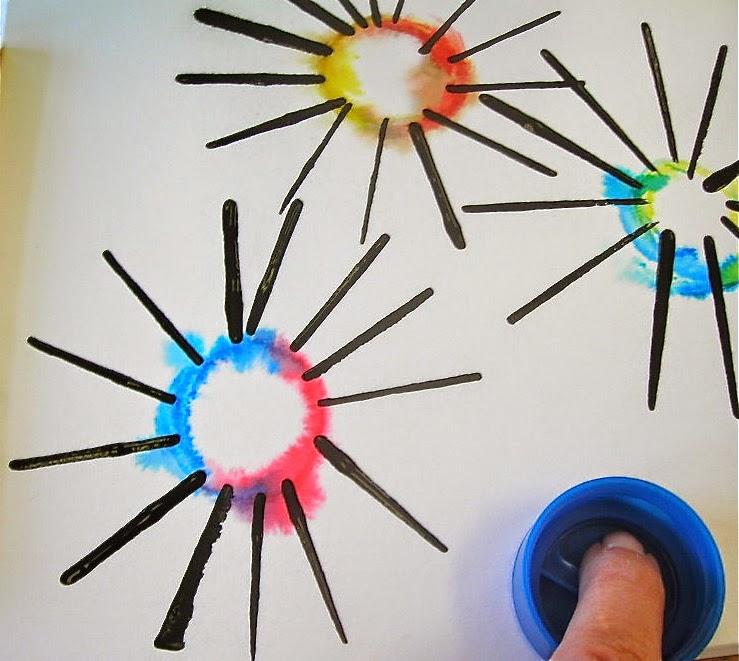
First, using washable Crayola markers, students colored half of a lid in one color and the other half in another color.
Then they brushed plain water on the area of the board they were planning to print and twisted the lid as the firmly pressed it onto the board. It was important to use plenty of water on this very warm day!!
 I asked kids to predict what their "mixed" color would be. They were delighted to see how the marker turned to paint and ran every which way on their board!!
When everyone had printed 3, 4 or 5 circles, I demonstrated how to dip a piece of board into black tempera and print the "rays" around their fireworks.


 Some lines would "bump into" other lines -- that was great. Some lines would "go off" the page -- also great. It was fun watching kids plan the placement of their lines.
This is one of those lessons that is "just right" developmentally for kindergarteners to play around with. We heard a LOT of "Oh, look, I made orange!!" and "It's purple -- look at how it is running into the water!!" and "It's just like exploding fireworks!! -- When will I get this back??" The paintings came to life with the addition of the black!
When they are dry I'll post some of the results.

We didn't have time to extend this lesson today, but adding a building or 2 to the composition would be fun -- maybe talking about artist James Rizzi.
This building is painted foam core with cut construction paper windows.