Saturday, May 25, 2013

Twisted Circles


Kindergarteners started this lesson viewing at a collection of paintings on the Smartboard, looking for what they all had in common. (They all had a lot of circles.)


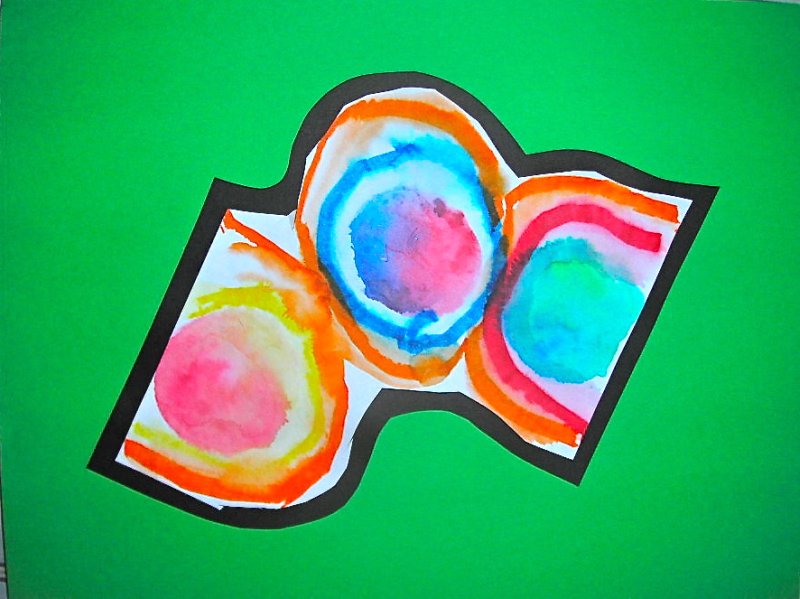
To start their circles, students used 2 primary colored washable markers (we used regular Crayola brand) to color the top of their marker. Then they brushed clear water on their paper, put the marker on the wet spot and twisted. Even though most of these kids knew what color to expect from the mixing, I still heard a lot of exclamations, "Oooooo, I made orange!!!!" I wrote more about this process here.


After printing 3 or 4 circles, I reviewed with the kids how to use the sides of the markers to get a thick line and they drew concentric circles around their prints (leaving a white space between lines) until the lines "bumped" another circle. During this, I walked around helping those who needed it to hold the marker and turn the paper as they tried to get that thick line. Our kindergartens have 26 - 28 kids in a class, so I had to move fast!!!


The next step was to "paint" water in the white spaces, touching the side of the brush to the marker line. There were more "oooohs amd aaaahs" as the color from the marker lines moved into the white spaces making a light tint. Such fun!!!

Their last step was to cut out their shape and glue it (using small dots of Glue All around the edges) and place it in the center of a black 9" X 12" piece of construction paper.


Using the markers and water looks a lot like watercolor, doesn't it? For kids who may not have paint at home, this is a simple way to get the painterly look!!


Kinders used a lot of skills in producing this art piece: printing, using the markers in a new way, brushwork, cutting curves, planning colors, gluing, They all did a GREAT job and I'd say are ready for 1st grade. Not long now -- only 3 weeks!!!

Sunday, May 19, 2013

Our Painted Gardens


Using the colorful painted papers that they made last week (HERE), kindergarteners cut and glued their own garden collage patterned after Lois Ehlert's Planting a Rainbow.


The table set-up had all the colored papers (I cut them down to an appropriate size) sorted into flower colors and stem/leaf colors, glue cups, scissors, etc. I asked that they start with one long, one medium and one short stem. The long stem was pre-cut and waiting on their board and I taught how to use 3 (that is THREE) dots of glue on each stem, one dot at the top, one in the middle and one at the end. We kept reiterating, "A DOT IS A LOT" so students would not spread the glue like peanut butter on a sandwich!!!
I gotta say, the colored papers started out nice and neat like this, but by the time the sixth class  arrived we had QUITE an assortment of scraps. I kept adding more "whole rectangles" to the pile and we had plenty of paper to complete the project with left-overs for another time!!
 Once the stems were glued, and looking at flower pictures on the Smartboard for reference, I taught how to cut a zig-zag line (starting at the corner and cutting diagonally) for the top of the tulip and curved lines for the bottom, so that the bottom of the flower looked like the letter "U."


I also demonstrated cutting a circle, trying to stay near the edge of the paper so that the circle wouldn't end up too small!! For the basic leaf shape, I modeled cutting a curve up from the mid-point of the bottom to the mid-point of the top of the rectangle and then doing the same on the other side. However, once kids had scraps, they were encouraged to design their own leaf shapes.


No pencils were used during the cutting process, so the result were some pretty creative flowers!!


Color choice and composition was left up to the kids to decide. The only thing I asked was that they try to glue their stems even with the bottom of the paper so we didn't have "floating flowers." Most were successful with that.


This was a great opportunity to circulate and help kids with cutting skills. Once before I posted about the use of scissors (HERE) and I REALLY saw a variety of ways that kids can hold scissors during this lesson. Probably the most creative was the child who had the scissors turned toward herself and was cutting top to bottom!!


The saddest part of this project is that I have to give all this art back to the students!! I could take any of these home to hang on my wall!! The best part was that the kids didn't want to stop creating!!


 Kids who finished early cut flowers for a larger mural that we will be hanging in the hallway and leaving up to welcome students back in the Fall. As soon as I get it up, I will show you that, too!!

Have a great week at school!


Wednesday, May 8, 2013

Painted Papers for a Kindergarten Garden

I have long admired the website, Painted Paper, and promised myself that one of these days we, too,  would spend a whole day just painting papers to be shared and used for a future project. Well, today was the day!!

Kindergarteners started out looking at a photo of Eric Carle and some pictures of some of his "painted paper" book characters for them to identify. Then we watched a short slide show from his website showing how he paints his paper (HERE).

Next, it was time to splash into the painting our papers for next week's collage patterned after Lois Ehlert's, Planting a Rainbow.


Each of 6 tables had a different color paper to start with (the 6 colors of the color wheel, which happen to match our table names). I was focusing on how to hold the brush and make broad, sweeping right to left (and left to right) strokes across the paper and filling the paper with paint. When they finished this background layer, we learned how to clean "Mr. Brush" and test that the brush was clean by "painting" our hand (hopefully with clean water!!).

Then, each table had a different method to use to add their 2nd color for a pattern or design. One table had brayers, one used 1 finger dipped in paint to make fingerpaint road, one table had sponge prints, one had sponge brushes, one had lids to make prints and one used brushes. This way, all the painted papers had a different look to them.


This was the first time these kindergarteners had visited the art room, so there was a lot to learn about routines, too. One of those was we carry our art with 2 hands and another was how we place 4 pieces of art on our drying racks and then put up another rack for the next group coming with paintings to place.


Everyone did a GREAT job and we will have lots of painted papers for next week when I will share the results!!

These are a few that were dry so I could start cutting them into small, manageable pieces that kids will use for their cutting next week. I am sorting them by colors.

Saturday, May 4, 2013

Primary Colors for our Mice

 The art room echoed "Oh look, green!" and "I just made orange!" as first graders overlapped primary colors to make a background for their Mouse Paint mice. I used Ellen Stoll Walsh's Mouse Paint to reinforce the concept of primary and secondary colors.

Students started with yellow cake tempera and painted about one third of their background, starting at the corner and brushing towards the center. Then, after getting their brushes REALLY clean they did the same with red paint, overlapping part of the yellow, creating orange. When they added blue, they overlapped both red and yellow, making purple and green. (That's when the ooh's and aah's started.) All this was done at their tables.


Then we moved back to the rug area and talked about how to "pinch tear" the shape of the mouse body. This is always a bit challenging for little ones, but with a little help, everyone was successful.


When the bodies were torn, students returned to their tables (where the backgrounds had had a chance to dry a bit) and cut pink ears and tails to glue on to their bodies with small dots of glue. One of the classroom teachers shared her class's reminder about applying glue, "A dot is a lot" -- I loved it!!!


 Before gluing the mouse (or mice) on the background, I asked kids to decide where they would place it and paint the bottom part of the mouse the color of the background where it would be. We had talked about camouflage when we read Mouse Paint.


Students could choose to paint their mouse with a primary color, or mix two colors to paint the mouse a secondary color. They used small lids as palettes for their mixing and many referred back to the colors they had used in the background to mix the secondary color that they wanted. I put masking tape over the secondary colors in the tempera cake tray so kids would have to mix primary colors if they wanted orange, green or purple -- tricky, huh??


Now that the art is posted in the hallway, I hear lots of kids (and parents) talking about one of their favorite books as they pass by!!
Next week it is on to some Kindergarten projects, oh boy!!!!