Wednesday, September 26, 2012

A Few Tinted Tree Results

3rd graders finished their tinted lollipop trees last week. They used white paint to tint colors for their concentric circled lollipops and shaded the crayon trunks using a darker color on one side. We also had talked about balancing the colors of their lollipops, thinking about placement of warm and cool colors. I loved the way students were surprised at the fanciful look of their trees as they began assembling the "lollipops" on them. I heard a lot of mutual compliments as they shared their work with each other!!

You may remember this recent post (click here). We used the song by Burl Ives as inspiration:

                                                                                                              The Lollipop Tree
One fine day in early spring I played a funny trick.
Right in the yard behind our house I planted a lollipop stick.
Then every day I watered it well and watched it carefully.
I hoped one day that stick would grow to be a lollipop tree.

Chorus:
Ah, ha, ha, Oh, ho, ho, what a place to be;
Under my lollipop, lollipop, lollipop, lolli, lolli, lollipop tree.
Ah, ha, ha, Oh, ho, ho, what a place to be;
Under my lollipop, lollipop, lollipop, lolli, lolli, lollipop tree.

Then one day I woke to find a very lovely sight.
A tree all full of lollipops had grown in the dead of night.
Well, I sat beneath that wonderful tree
and looked up with a grin;
And when I opened up my mouth, a lollipop dropped right in!!
(Chorus)
Winter came and days grew cold, as winter days will do.
And on my tree, my lovely tree, not one little lollipop grew.
From every branch an icicle hung. The limbs were bare as bone.
But when I broke those icicles off,
they turned to ice cream cones!!
(Chorus)
Performed by Burl Ives
Songwriters: JOE DARION, GEORGE KLEINSINGER

Friday, September 21, 2012

A Few Classroom Tweaks

Just when you think you have classroom organization and management "down" you get that class that needs something a bit different, tailored just for them. After a couple of those instances last year, I decided to change things up a bit this year.

First, instead of having just my 2 large color wheels at each end of the room (plus a central one on the Smartboard) I added smaller, laminated color wheels to the crayon table markers hanging above each work table. These crayons are large (maybe a yard long) plastic piggy banks in each of the primary and secondary colors that a colleague gave me last year. Now students just have to look up to find a nearby color wheel for reference!

As a tie-in to these colored crayon table markers, we have a new way of getting started on projects this year. I was frustrated last year with all the art that got turned in without names or room numbers -- often 2 or 3 kids per class. When you see 120+ kids per grade level those numbers add up!!!

My classes all start out sitting in our rug area for a quick lesson on the Smartboard or a demonstration. When it's time to go to their tables (4-6 kids per table), I now give each student a colored ticket telling them which "color" table to go to. Their first task is ALWAYS to write their name and room # on the back of their paper. One person at the table has a ticket with a circle on it. It is that person's job to check and make sure everyone at the table has written their name and room #. That "circle person" then collects the tickets and delivers them to me. When I have all the tickets it is time to start whatever directions I have. I was concerned that this extra step might be time-consuming, but I have found just the opposite. Kids are focused and anxious to "get on with it" so this whole process only takes 1 or 2 minutes and my problem of "no name" is solved!!


My third tweak is a small but necessary one. Our class size increased this year and my rug area is no longer large enough for a whole class to sit in a half circle. So, I have 12 chairs, located on the perimeter of the carpet area to which I tied a piece of red yarn. The first 12 people into the room sit in those chairs and the rest of the class sits in front of them in a semi-circle, creating 2 rows where everyone can see.


Voila, another problem solved. But that is what we teachers do, isn't it -- solve little (and sometimes big) problems all day long!!
Have a great week-end (problem-free)!!
ps.  I forgot to mention, it was so hot here last week-end that I stayed inside and FINALLY set up a Pinterest account. I spent hours  on Saturday browsing around the web. I probably haven't found things that all you long time "Pinteresters" haven't already found, but if you'd care to check out my boards, there's a button near the bottom of the right hand column on the blog. Not sure how diligent I'll be at pinning - I already have a sore thumb joint from all that clicking around!!!!

Saturday, September 15, 2012

Dots, Dots and More Dots!!

You may remember that I mentioned International Dot Day (which is today!!) in this post here. Well, 4th graders finished their patterned dots this week.

They are now posted in two hallways and in the Art Room.

The task for these students, using a color wheel for reference, was to paint their concentric circles in pairs of complementary colors with black and white line design circles separating the colors. This was an opportunity to revisit the color wheel, design line motifs for the black/white circle and practice brush control (as described here).
Students used cake tempera and Sharpie markers. This was a good chance to review how to clean their brush before changing colors ( "Swish, swish, wipe, wipe, dab, dab" (on the sponge). Everyone did a great job with this -- no messed up cakes at clean up time!!!
Most students were successful in using complementary colors, but a few did struggle with the concept as they painted their dots. Good thing we will be doing another project next week focusing on complementary colors!!!

Third graders are half done with their lollipop trees (last week's post) and will be finishing up on Thursday so we can add their contribution to our "Dot Day" bulletin boards.

Sunday, September 9, 2012

Tints, Shades and "Lollipop Trees"

These great trees that are near our school will be 3rd graders' jumping off point for this week's Lollipop Trees.

The tree trunks will be any color of crayon (on old telephone book pages) and shaded to create the illusion of 3 dimension. This part of the project presents an opportunity to represent shapes students see in nature. (The photo will be enlarged on the Smartboard for all to see.)

The "lollipops" will start with a pure hue dot (in honor of International Dot Day, Sept. 15th) in the center, surrounded by concentric circles of two lighter tints. I hope that the kids have time to create 5 or 6 circles. They will be using tempera cakes for the main color, but liquid tempera for the white. I have white plastic palettes for students to mix their tints.

In this sample there are six lollipops representing the colors on the color wheel.

Here is another tree sample from another class where the lollipops were created using complementary crayon designs with a watercolor wash.
When I have the time, I like to teach the class Burl Ives' version of the song, "The Lollipop Tree." A great lesson for another day would be for kids to draw the story of the song as a storyboard!!

Tuesday, September 4, 2012

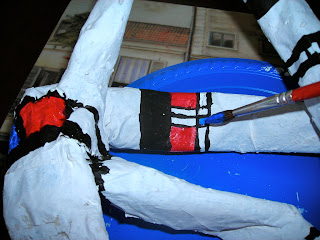
3-D Mondrian Sculpture

I'm sure we all have "great" project ideas that we end up not using for one reason or another. Well, this was one of those that turned out taking too many sessions (four -- because of drying time!!) for me to be able to use with my fifth grade groups at school, but I thought I would share because it might be fun for someone else with more time than I have to try.


The supplies are minimal, 2 sheets of newspaper for each "ring, newspaper strips, paper mache paste (I used a mixture of flour and water because it's inexpensive and works just fine), gesso and acrylic paint.

First, I rolled 2 sheets of newspaper diagonally and tucked the ends together to form a ring. I made 2 rings, bent them into interesting forms and paper mached them. Once they were each covered with wet strips, I laid one on top of the other and paper mached the "joints" so the two would dry stuck together.


I always have kids paper mache on a plastic plate or a meat tray  because it makes storing and carrying easier.
When the structure was dry, I painted it with white gesso.

When the gesso layer had dried, using images of Mondrian's Compositions and Frank Lloyd Wright's window designs, I painted the black lines.

The last step was to add small blocks of primary colors to some of the areas created by the black lines, leaving most of the sculpture white. Voila!!

This is a great project for kids to do at home!!! It provides opportunities to discuss color(primary colors and balance of color), line, shape, form, balance and repetition.