
Friday, December 31, 2010
Tuesday, December 28, 2010
Nostalgia
I hope everyone had (and is still having) a great holiday. It will be another week before I'm back to school with kids' art to share, but I came across this bit that I forgot to post earlier in the month.
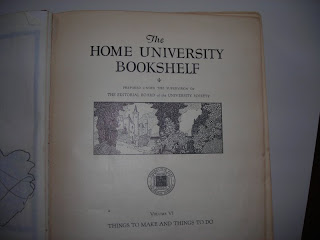
OK, so it's not totally related to art lessons, but it may give students a different perspective to think about. I was recently at an estate sale browsing through a room filled with books and old photos. The lovely colored picture on the front of this book caught my eye.


OK, so it's not totally related to art lessons, but it may give students a different perspective to think about. I was recently at an estate sale browsing through a room filled with books and old photos. The lovely colored picture on the front of this book caught my eye.


I started flipping through it and realized that it was a 1938 art/activity book for kids titled, The Home University Bookshelf. I snapped it up, anxious to take it to school to share with my students the pictures of what kids in the 1930’s did for entertainment (before computers, TV, etc.). It is really a charming book.
Here are a few of the pictures:

My brother and I used to try all sorts of these hand shadows!!

I thought it was cool that the book was designed for boys and girls with cooking, sewing, woodworking, and building model airplanes as well as art and activity pages all in one place. Here is a type of page I can remember doing in my childhood -- finding what is wrong with the picture. Remember these?? Sort of like an old fashioned Where's Waldo!!

Tuesday, December 21, 2010
Have a Wonderful Holiday

My mom made this hanging for me several years ago and I loved it so much that I'd leave it hanging long after the holidays were over -- like until August!! So this year I asked her to make me one for the other seasons, too!! Aren't mothers wonderful?!!
I hope that you and your families enjoy the good cheer of the holidays as much as I will with my family!!
Sunday, December 19, 2010
Home Art Supplies
This post is mainly for PARENTS but I'll bet other teachers of art have ideas they would probably add to my "Home Basics" list:
 When I think back on my childhood, it seems that we always had basic art supplies around for a rainy day project, even though we definitely lived on a budget. I am often asked what I think kids should have at home to aid in creativity, so here is the beginning of a list. (A walk through any art or craft store would surely turn up many more items for a list, but these are basics that one could get in a drug store.) Aside from spending money, though, this is also a perfect time of the year to save gift wrapping discards and newspaper inserts to add to your child's art stash. Any of the items on my list would be great stocking stuffers, too!!!
Basics:
Papers - good drawing or watercolor paper OR plain paper from you printer, newspaper,
magazines, cardboard (think all those packaged foods in you pantry), old sheet music,
old playing cards, old wrapping paper, junk mail, discarded paper from Mom or Dad's
work, etc.
You might ask about the junk mail and old magazines. I use them all the time to paint
over with acrylic paint. Great artists reused canvases, so why shouldn't I help our
landfill problem! Great art paper is a luxury and wonderful to have, but not a
necessity.
Pencils and sharpener
Crayons - just the basic colors
The big, fancy boxes are fun, but not necessary. Kids can
use what they know about the color wheel to mix the colors they need.
A set of basic colored water soluble markers
a black marking pen
Ruler
Pair of scissors
stapler
White glue (like Elmer's)
Glue sticks
(good ones that actually stick!! I like Dennison's)
Tape - Scotch, masking, etc.
Student Watercolor Set - 8 colors
I like Prang and Crayola. I particularly like sets with white lids so kids can really
see the colors they are mixing.
Scraps of fabrics and yarns (if you are lucky enough to know someone who sews or
knits.)
OK, so this one isn't exactly a basic, but it sure helps with collages and weavings!
Not only will these supplies work for creating fun art, I think they are necessities for producing quality work for those more elaborate school projects or homework assignments. A medium sized drawer, or even a shoebox would be great for teaching organizing skills and having all supplies in one place. Happy Creating!!!
Thursday, December 16, 2010
Teacher's (and parents') Delight
This time of year it takes me twice as long to read the morning paper because I am ever on the look out for colorful enclosures to use for artsy purposes.
 The ad magazines and full page adds are SO plentiful that my collage/scrap box is overflowing. You'd think that would be enough, but noooo...


What does it say about me when I start selecting the packaged foods I buy for the colors of their boxes?!!
If I am to believe my weather person on TV, much of the country is either already or about to be gripped by cold or wet weather and a lot of kids are going to be wondering what to do with their time indoors. Well, here is the answer -- use what's in the house already and see what you can create.
With teaching on hold until January, shopping and decorating done, and presents wrapped,

(I can't even BELIEVE I'm this far along this year) maybe I'll even see what I can do with some of these household finds.
Sunday, December 12, 2010
Lines and Circles Results
4th graders were really intrigued with how the lines for this project were made. (See last week's post.) I wish we had had just 15 more minutes so that all kids could have made multiple lines and circles. Even so, while my prime objective was complementary colors, I loved how children considered composition as they placed their lines and circle(s). What fun!! I will definitely do this again in the future!


The folding was a bit tricky for a few, but once one person at each table "got it" they were able to act as experts and help others. I had the kids start by making their circle drawing first so that they finished and moved on to the lines at different times. Since they reached the folding stage at staggered times I could pretty easily get to those who needed help quickly. There was that wonderful "aha moment" when kids saw how the folds ended up showing both colors.


Hi There!

Art Teacher Blog Directory
Here is an opportunity to connect with other art teachers and the blogs they write. If this sounds interesting, visit the Vivid Layers blog to read more about it. I couldn't figure out how to post it to my blog, so I will just be checking back with Vivid Layers to keep in touch.
Thursday, December 9, 2010
Action Figure Results
This was a week for 4th graders to finish up a couple of projects. The action figures that we started 2 weeks ago are up in the display case. I posted this lesson earlier.
 Using Matisse as a model, I asked children to design color systems that they could explain in each of their background sections. It was fun to walk around and have them articulate their thinking (some being more complicated than others).


This was early on when their figures were on the drying racks. I made these racks last summer out of strips of wood (I forget the kind) that the lumber yard recommended and window screening. The racks stack so I can accommodate as many kids as necessary.

Monday, December 6, 2010
Lines and Circles

The inspiration for this project came from a couple of places. I first became aware of the circle designs of Kaffe Fassett in my knitting and quilt making years ago. He actually works in many varied media now. See his website here. I knew I wanted 4th
graders to work with similar circle designs. Then I saw a line project at Artsonia ( Elsmere Elementary School, Delmar, New York) that I thought would go well with our circles. See their projects here.
We have been working on complementary colors and many of my students are still working on mastering the concept, so this will help to reinforce that.
We'll start by choosing 2 construction paper strips that are complementary colors (opposites on the color wheel) and carefully fold them in half lengthwise.

Next, students will make cuts along one side ONLY to the fold.

They will fold the flaps alternately in opposite directions, keeping the two colors together.

We'll use white glue on each flap.

I am asking students to start their line at any edge and make it curve. Any additional lines must also start at an edge and touch another line. I am trying to avoid random, floating lines and set up a connected design.

Finally, children will use a black marker to draw a circle design, starting in the center and working outward. I am asking that they use the colors in one of their lines in their circle design. Actually, I am hoping that we can accomplish all this in our 50 minute session, but realistically, I am not sure that everyone will get to the circle part. But, we'll see!! I thought this was fun to make. It actually got me started making mandala designs in my own art journal. I hope the class will like it as much as I did!!

Thursday, December 2, 2010
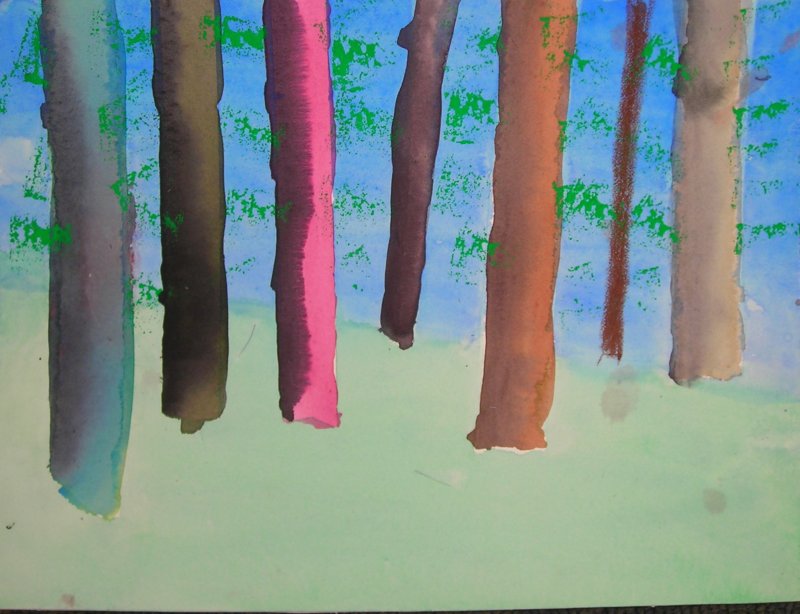
Forest Results
4th graders have been focusing on light source to make the trunks of their trees look like cylinders with dimension. Using Google images of forests as their guide, they learned to use complementary colors (opposites) on the color wheel to make different browns and "wet on wet" watercolor to shade the dark side of their trunks. This was a follow-up lesson to the bamboo stalks where kids shaded cylinders using oil pastels. I found a lot of students went to get the little "light" icons we used in that lesson to remind them where the light was coming from. I posted the original "forest" lesson with all the steps a few weeks ago, but thought you might like to see some of the results:


Wednesday, December 1, 2010
Celebrate Color!


Near it on the chest was this bowl, looking like it needed something.


Sunday, November 28, 2010
Action Figures
4th graders will be spending the next 2 class sessions creating action figures (with focus on proportion) and a background that demonstrates an understanding of the color wheel and color systems.
We start with kids measuring their own heads and figuring out how many heads tall they are (a little math never hurt anybody!). They'll use paper pieces (cut to 7 1/2 heads to the body) to position a figure doing something active. I like to use Keith Haring's "Six Dancing People" and Bernard Stanley Hoyes, "In the Spirit" to illustrate how artists use movement in the human body. We often brainstorm some activities that people do that involve body movement. Sometimes kids pose for each other to get the joints and angles the way they want them. Then I have them loosely make a contour drawing around the pieces. I have to caution them NOT to trace or we end up with strange block figures!!


We start with kids measuring their own heads and figuring out how many heads tall they are (a little math never hurt anybody!). They'll use paper pieces (cut to 7 1/2 heads to the body) to position a figure doing something active. I like to use Keith Haring's "Six Dancing People" and Bernard Stanley Hoyes, "In the Spirit" to illustrate how artists use movement in the human body. We often brainstorm some activities that people do that involve body movement. Sometimes kids pose for each other to get the joints and angles the way they want them. Then I have them loosely make a contour drawing around the pieces. I have to caution them NOT to trace or we end up with strange block figures!!

Next, students paint their figure using tints of acrylics. If kids finish early they can use the body pieces to make other poses and try some gesture drawings.

On another day, when the paint is dry, children draw a ground line and cut off the bottom portion of their painting (cutting around the legs).

They glue their painting on a piece of construction paper that is the complement color of their figure. After drawing a few lines to divide the upper part of their drawing they use crayons, oil pastels or markers to make line designs in each section. I ask that one segment be colored solid in the same color as their bottom construction paper and that each section demonstrate some color system that they can explain (ie. primary colors, complementary colors, warm colors, etc). I usually use Matisse's "Woman in a Purple Robe" when I talk about background patterns and colors.

Also, when I did this lesson as a regular classroom teacher, we also wrote cinquains (link: http://teams.lacoe.edu/documentation/classrooms/amy/algebra/5-6/activities/poetry/cinquain.html) to illustrate the action of the figure and attached them to the final mounting. I don't think I'll have time for that this year, though.

I'll post some finished results when I get them.
Wednesday, November 24, 2010
Happy Thanksgiving
It's time to start thinking about cooking now. Hope everyone has a happy turkey day!!

Tuesday, November 23, 2010
Chihuly Inspired
Early this school year, fueled with ideas from many blogs on Dale Chiluly's glass art, I started shopping for #6 plastic (found it at our local Smart & Final)

and saving my large cranberry juice bottles to use as a base. A few of the blogs I remember particularly are MaryMaking (http://marymaking.blogspot.com/2010/02/dale-chihuly-inspired-sculpture.html), Art With Mr. E, (http://artwithmre.blogspot.com/) and http://mnpschihulyartlessons.blogspot.com/ . There was one other where the teacher used 9 oz. clear cups that was interesting, too, but I can't find it now.
Anyway, the other day I went to my box of recycled stuff where I had dumped my large plastic bottles and every last one of them was GONE!! Perhaps someone thought he or she was being helpful by dumping them for me -- I don't know -- but I knew I couldn't drink enough juice in the time left before we started the lesson, so I went to the 4th grades and put out the call to the kids, hoping I wouldn't get 100 large bottles!!! (I only needed 4 or 5.)
A few years ago, when visiting Seattle, I had the opportunity to see a lot of Chihuly's work (including his Bridge of Glass) and visit the Museum of Glass in Tacoma where they have a "hot shop" with guest artists making glass art. It was fascinating!! I showed my class some video clips from Dale Chihuly's website (see my gadget of Sites I Like for the link). We talked about line designs and how placing complementary colors next to each other creates contrast, and then they were off, armed with permanent markers and the clear plastic.

When the kids were finished I popped their work into a small convection oven we have at school and watched the magic happen.
 I did this outside in the hallway today. It was a breezy day -- perfect, because I couldn't find any definitive info on the web guaranteeing me that the fumes wouldn't give me some dreaded disease. I wasn't taking any chances.
After the shapes "baked and curled" I used a glue gun to attach them to the large bottle bases and "Lo and behold..."

 Each class got one of their "teamwork" creations and the Art Room gets one, too. Before I started hot gluing I tied a heavy piece of fish line around the neck of the bottle so we could hang the installation from the ceiling. I know a lot of folks have posted Dale Chihuly inspired photos lately, but these turned out so whimsical that I couldn't resist the temptation to share!!
CA Content Standard - 2.8 Use complementary colors in an original composition to show contrast and emphasis.

and saving my large cranberry juice bottles to use as a base. A few of the blogs I remember particularly are MaryMaking (http://marymaking.blogspot.com/2010/02/dale-chihuly-inspired-sculpture.html), Art With Mr. E, (http://artwithmre.blogspot.com/) and http://mnpschihulyartlessons.blogspot.com/ . There was one other where the teacher used 9 oz. clear cups that was interesting, too, but I can't find it now.
Anyway, the other day I went to my box of recycled stuff where I had dumped my large plastic bottles and every last one of them was GONE!! Perhaps someone thought he or she was being helpful by dumping them for me -- I don't know -- but I knew I couldn't drink enough juice in the time left before we started the lesson, so I went to the 4th grades and put out the call to the kids, hoping I wouldn't get 100 large bottles!!! (I only needed 4 or 5.)
A few years ago, when visiting Seattle, I had the opportunity to see a lot of Chihuly's work (including his Bridge of Glass) and visit the Museum of Glass in Tacoma where they have a "hot shop" with guest artists making glass art. It was fascinating!! I showed my class some video clips from Dale Chihuly's website (see my gadget of Sites I Like for the link). We talked about line designs and how placing complementary colors next to each other creates contrast, and then they were off, armed with permanent markers and the clear plastic.

When the kids were finished I popped their work into a small convection oven we have at school and watched the magic happen.

After the shapes "baked and curled" I used a glue gun to attach them to the large bottle bases and "Lo and behold..."


CA Content Standard - 2.8 Use complementary colors in an original composition to show contrast and emphasis.
Sunday, November 21, 2010
Watercolor Practice Puzzle
Last year my students loved a set of cardboard quilting squares that could be assembled in a variety of ways to create different "quilt" tops. I thought that this year's students could make similar quilt squares to practice using watercolors and mixing secondary colors.
Each child will have 4-6 squares of watercolor paper cut 3" X 3". They'll draw a diagonal line from corner to corner and then another from the midpoint of that line to one of the other corners. (see sample)
 They will trace over the pencil lines with a heavy crayon line. This creates one large triangle and 2 smaller triangles.
Using watercolors, kids will paint the 2 smaller triangles with any 2 primary colors and then mix those 2 colors together to get a secondary color to use to paint the larger triangle.
 When the squares dry, students can move them around like puzzle pieces to make different designs. They will soon want to combine their squares with those of their neighbors and pretty soon I anticipate seeing a large quilt design materializing on the rug!! What fun!!

Each child will have 4-6 squares of watercolor paper cut 3" X 3". They'll draw a diagonal line from corner to corner and then another from the midpoint of that line to one of the other corners. (see sample)

Using watercolors, kids will paint the 2 smaller triangles with any 2 primary colors and then mix those 2 colors together to get a secondary color to use to paint the larger triangle.


Subscribe to:
Posts (Atom)